FREE
circuits!
How to build Temperature-Controlled Soldering Iron
October 1, 2010 - category: PWM and power controlDescription
One reason why commercial soldering stations are expensive is that, in general, they require the use of soldering irons with inbuilt temperature sensors, such as thermocouples. This circuit eliminates the need for a special sensor because it senses the temperature of a soldering iron heating element directly from its resistance. Thus this circuit will, in principle, work with any iron with a resistance which varies predictably and in the right direction with temperature (ie, positive temperature coefficient).
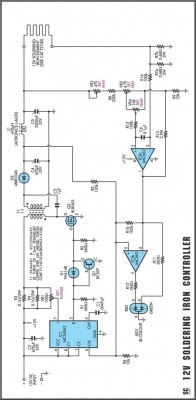
A soldering iron that’s ideally suited for use with this controller is available from Dick Smith Electronics (Cat T-2100). This circuit runs from a 12V battery or a mains-operated DC source. It works as follows: a DC-DC converter (IC1, Q1, D1, Q2, T1, D2, L1, etc) steps up the 12V DC input to about 16V. The higher voltage boosts the power to the iron and reduces warm-up time. This output voltage is applied to a resistance bridge in which the heating element of the iron forms one leg.
Circuit diagram:
The other components of the bridge include resistors R7-R9 and pots VR2-VR4. When the iron reaches a preset temperature, as set by VR4, the output of IC2a goes high, sending a signal to switching regulator IC1. This forces the output of the converter to a relatively low voltage. A bi-colour LED indicates that the iron has reached the preset temperature by changing from red to green. The iron now begins to cool until it drops below the preset temperature, at which point the output voltage from the DC-DC converter goes high again and the cycle repeats.
A degree of hysteresis built into the circuit makes the LED flicker between red and green while the iron is maintained at its preset temperature. Calibrate the circuit as follows: while the iron is still relatively cold, monitor the input voltage and current and adjust VR1 so that the input power (Volts x Amps) is about 50W. When you have done that, set VR4 to maximum and adjust VR2 so that the LED flickers between red and green when the iron has reached the desired maximum temperature.
Finally, set VR4 to mid-position and adjust VR3 so that the LED flickers when the iron reaches the desired mid-range operating temperature. As an example, you might choose to set the maximum temperature to about 400°C and the mid-range operating temperature to about 350°C. The overall temperature range, in that case, should be approximately 280°C to 400°C. Check that the calibration is correct and repeat the adjustment procedure if necessary. Use a temperature probe, preferably one designed especially for soldering irons, rather than guesswork, when making the adjustment.
Note:
VR4 should have a logarithmic taper to compensate for non-linearity in the temperature-resistance characteristic of the soldering iron.
author: Herman Nacinovich, Silicon Chip
circuit from http://www.extremecircuits.net/2010/05/temperature-controlled-soldering-iron.html


 This category